DJ Turntable Controls
As you’ll soon see, a vinyl turntable is a fairly complex piece of equipment. There are a lot of intricate details to picking up sound from analog media such as a vinyl record, which makes numerous controls necessary. Fortunately, you as a DJ will only have to deal with a few of them.
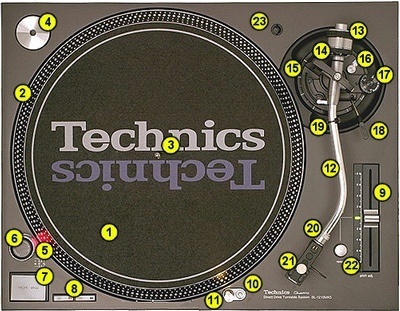
Below are listed the controls of a professional DJ record player, as exemplified by the legendary Technics SL-1210MK5 turntable.

- The platter: The rotating platform where the record is placed.
- Strobe dots: Dots on the side of the platter that are supposed to “freeze” on certain pitch positions (-3.3%, 0%, 3.3%, +6%). These dots allow you to check how precisely the deck is spinning.
- Spindle: When on the platter, the record’s hole is pierced by the spindle. The spindle is not stationary but rotates along with the platter.
- 45 RPM adaptor: Fits over the spindle for the 7-inch records that have a big hole.
- Strobe light: Flashing light that illuminates the strobe dots.
- Power switch: Rotating on/off switch for the deck. Sits on top of the strobe.
- Start/Stop button: Pressing this button starts the platter. Pressing it again stops it.
- 33/45 RPM button: Allows for switching the speed of the platter’s rotation between 33 RPM and 45 RPM (rotations per minute).
- Pitch control: A vital part of a professional DJ deck. Allows for precisely setting the speed of the platter’s rotation within a +/-8% range (on some decks, the range is wider). Moving the pitch control downward – in the direction of the rotation – speeds the record up. Moving the pitch upward slows it down. The scale to the left of the slider allows you to track the percentage value of the speed change.
- Target light button: Pressing this button makes the target light pop up.
- Target light: Shines the light along the grooves of the record, allowing you to see where the needle is. (This is especially helpful in low-light conditions such as a DJ booth.) You can hide the target light by pressing it.
- Tone arm: Another important part of a deck. It’s a hollow metal tube to which the headshell is attached on one end and the counterweight on another.
- Counterweight: Allows you to adjust the stylus pressure on the record by counterbalancing its weight.
- Stylus pressure ring: If setup properly, shows the needle pressure in grams.
- Tone arm height adjustment ring: Allows you to set the height of the tone arm. The marks on the side indicate the current height in millimeters.
- Tone arm height adjustment lock: Allows you to lock the height of the tone arm after adjusting it with the ring.
- Anti-skating control: Sets the anti-skating force. The marks indicate the amount of force in grams.
- Cueing lever: Once the needle is set over the right place on the record, the cuing lever allows you to slowly lower the tone arm, and then pick it up. DJs typically keep the lever lowered all the time and place/pick up the needle by hand.
- Tone arm lock: Locks the arm on the tone arm rest, which is useful when transporting the turntable.
- Locking nut: Locks the headshell in the tone arm.
- Headshell: The cartridge is mounted on the headshell, which is in turn attached to the tone arm. The headshell also has a handle that the DJ holds when placing or picking up the needle.
- Pitch reset button: Forces the pitch to zero. In the SL-1210MK5, it’s an alternative to the famous (and annoying) click in the 0% pitch position that was characteristic of the SL-1200MK2.
- Headshell stand: This is where you can stick a spare headshell for your deck.
- Cartridge (not shown on photo): Converts the needle’s vibrations into electrical signal. The cartridge is mounted on the headshell with screws. Sometimes, the headshell and the cartridge are combined by the manufacturer into one unit (“integrated” type cart).
- Stylus (not shown on photo): A diamond needle that picks up sound. When following a record groove, the needle vibrates. The cartridge transforms these vibrations into electrical signal that represents the sound.
After more than thirty years since the introduction of Technics SL-1200MK2, the key controls of a DJ turntable have barely changed. Of course, today’s decks have a lot more cute features like digital display, forward/reverse buttons, pitch control range switch and so on. Refer to the manual for the details; the controls listed above are the most important ones.
About the Author JM
JM has played open-air gigs, shared the stage with the likes of ATB and had mix albums released commercially. He has been teaching DJing since 2008.
Session expired
Please log in again. The login page will open in a new tab. After logging in you can close it and return to this page.


LOL, just found the diagrams. This is why you’re hosting the information, and not someone like me, who apparently isn’t patient enough to read the WHOLE site before making a comment on it. My bad.
Still a great site, though.
Haha, no problem 🙂 Enjoy!
Thanks for sharing, I agree with everything I read